One morning you wake up and realize that this is it! You have nothing to build or manufacture anymore, you now have to assemble your dream machine.
Assembly:
Advice I have is to have all the drawings with you and to follow the instructions on each assembly very carefully. Then as you go make very sure that you use the correct fasteners and the right amount of washers as instructed in the plans. Start with assembly of the empennage first and then do the wings.
Very important is not just to visually check every nut, bolt and pipe fitting, but to mark it properly as a checked item once you have done it. Work systematically through everything. When you think you have done it, ask someone else (a fellow builder maybe) to do a double check. The lesson I have learned here is that you can easily miss something and secondly that you have to check it not just visually but with “spanner in hand” and actually testing it.
 
System checks:
Make sure that you check all systems such as brakes, fuel, engine control and flight control. Note that it is a CAA requirement to do a dual check on the engine control system as well as the flight control system. This dual check should also be an entry in your airframe logbook. One test that is often forgotten is a thorough fuel flow check with the boost pump on in our case.
 
 
Weight and Balance:
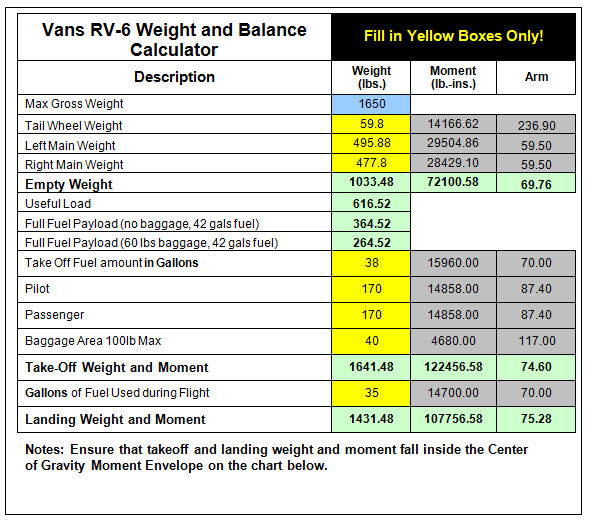
Attach everything including all your fairings and fill the engine with the prescribed amount of oil. Then do the weight and balance. Make sure that the aircraft is properly leveled when weighing, which can be a bit tricky with a tail wheel aircraft. Specially with your first weigh, take the time to carefully mark out your datum line and determine the proper arms. Some people just take the generic values from Vans, which can lead to wrong C of G calculations. Below is an example of the Weight and Balance document I like to use.

Documents needed:
In preparation for your Proving Authority to Fly you will need the following documents:
CAA application form and CAA Inspection form. You will find the latest forms on their website. Airframe logbook with all the necessary entries, stamps and signed off. Your weight and balance and a colour photograph of your aircraft.
Taxi Tests:
A lot has been written on this topic and it has often been said that you should not go onto the runway if you are not ready to fly. Statistics have shown a lot of accidents have happened while builders tried to do the so called “high speed taxi runs” and then inadvertently get airborne. RV's are high performance machine and WILL get airborne in just a few seconds if you open up the throttle. My advice is to do one or two slow runs on the runway just to burn in the brakes and verify its operation. It is also very easy to overheat your new engine as well as glaze cylinders with repeated taxi tests at low power. Remember that your new engine needs to run at max power, or as close as possible to max power for the first few hours.

Maiden Flight:
With everything checked and checked again and with your Proving Flight Authority to fly issued the big day has arrived. The law requires that at least the first flight and the last proving flight be done by a test pilot. Make sure you get someone who knows RV's well. The design is well sorted out by know but there can always be a few “builder induced” surprises and you better find that on the ground before the maiden.

In my opinion the first flight should be a short one overhead the field and is just to check all the engine parameters. The maiden flight with a new airframe and new engine is often not for the faint hearted and you have to plan well and know what to expect.

Usually after that has been verified the test pilot will examine slow flight in the landing configuration and then come in to land. Then you take off the cowls and do a thorough inspection. Try to rectify all the snags there might be before attempting the second flight.

Next month I will discuss Proving flight time and engine run in.
|
      |


