


Part Five
Getting the undercarriage installed is a fairly simple task, but please make sure that you have followed the plans and have installed all the items on the firewall that you have to before attaching the engine mount and nose gear. If you are building a tail dragger this is not that crucial because the engine mount is not part of the landing gear. Something often overlooked is the rivets on the firewall fuselage forward skin joints. There are rivets here that you cannot really get to after you have fitted the engine mount. This means at this early stage you have to think about cowl fastening. Some like Van's simple method using the hinges and some like cam locks. Make provision for your cowl systems now before you install the engine mount.
Once you have done this you can install the engine. Again there are a lot of fittings for all the different hoses etc. that you have to install on the back of the engine, before you can hang the engine. Please make sure to do this. Seeing the engine in place is usually a nice milestone in the build process.
You will have to start thinking about where and what you are going to install with regards to avionics, systems, instruments and lighting. Now it is the time to at least make a basic drawing of where you will need the wiring to go to. At the rate at which things are developing, my advice is to hang in there and not to start buying avionics at this stage. Rather wait a bit and see what the market has to offer when the time is right.
There are however a number of items you can tick off already. If you know your RV will be an IF platform or day VFR platform, you will more or less know where you want to position all the different antennas as well as what antennas you may need. Wiring to the wings are usually also quite straight forward. So you can make provision for lighting as well as things like heated pitot or the wing mounted roll servo for your mark 10 auto pilot. There are many internet sources of typical wiring schemes to guide you. Whatever you do, make sure you have made provision for extra wires by installing a draw wire that can be used later on.
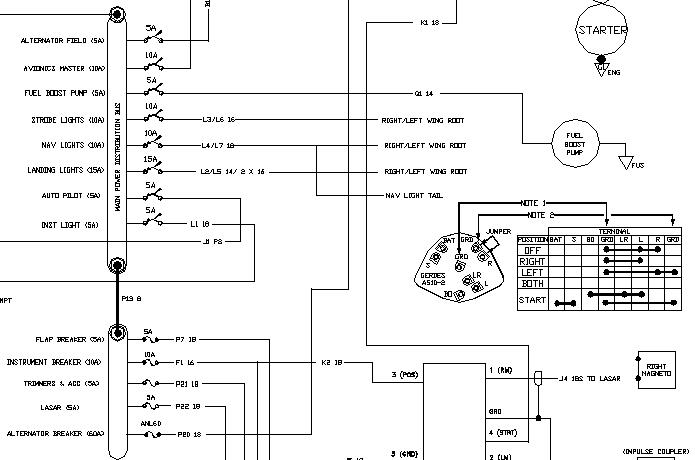
A Basic Wiring Diagram
The instrument panel is where you can really give your imagination wings. There are those who stick to a very simple VFR day panel with one radio, a transponder and a few round “steam” gauges. Then you can go to the other end of the scale where the panel can almost be an assembly of flying computers with multiple screens and GPS's. The bottom line is that you have to be happy with it.
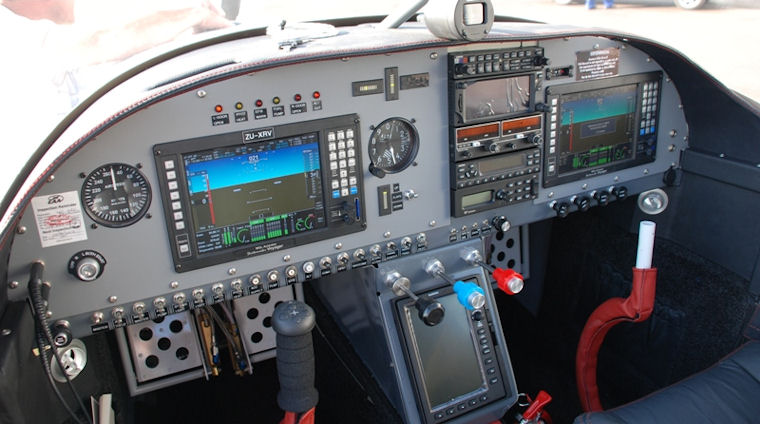
A Panel with all the bells and whistles
Looking at the typical two seater, the biggest single “part” you will get from Vans, will be the the piece of plexi glass that you have to cut at some stage. It will form the windscreen and canopy if you are building a slider or it will form the canopy and the back windows if you are building a tip-up. In the RV world they talk about the “big cut”. It is not so bad as it sounds. Make sure you measure and mark the cut line correctly and make sure that you let it soak in moderate heat before you start cutting.
The instructions call for a lot of holes to be drilled through the plexi glass in order to mount it. I often read posts on forums where guys are crying because their canopy has cracked while drilling or while fastening the screws. We are lucky that we have Chalkie Stobbart who first used the screw-less or bonding method, right here and this is in my mind the way to do it. He started with this by using Sikaflex and now the whole world is doing it this way.

Bonding the canopy with Sikaflex
You get rid of all those screws and you will never have the risk of your canopy cracking. Remember that you can also do the canopy skirts this way. Just make sure that you understand the process and use the right cleaners and primers where needed. There are different primers for metal and plexi glass.
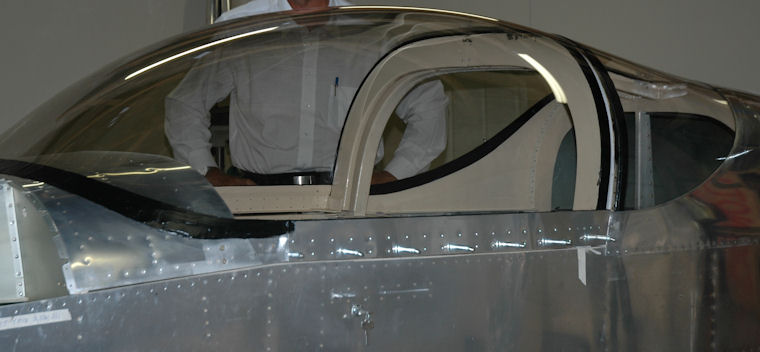
The canopy and windows finished
Next month we will move on to the firewall forward and engine.
 |
 |
 Copyright © 2024 Pilot's Post PTY Ltd
The information, views and opinions by the authors contributing to Pilot’s Post are not necessarily those of the editor or other writers at Pilot’s Post.
Copyright © 2024 Pilot's Post PTY Ltd
The information, views and opinions by the authors contributing to Pilot’s Post are not necessarily those of the editor or other writers at Pilot’s Post.