


We finished off last month by saying that there are some fun ways in which we can improve our overall Situational Awareness and Navigational Skills besides punching useless holes in the sky.
But before we go there let us consider a few factors that apply to us, the pilot situated at the sharp end of an aircraft whose behaviour and mindset makes up the majority share of determining the outcome of a flight!
A famous aviation legend (pilot), when asked what makes a good pilot, replied “keen eye sight”. In a sense he was spot on right and in those three words I think what he really was saying meant much more than just having good vision. He stated that in his youth he was an avid hunter and how he was taught and trained to read with his eyes and then anticipate how nature and the creatures were most likely to behave, how the wind direction and how his selected riffle would respond to the prevailing conditions and how many other factors would affect his success in the hunt. He also became acutely aware of the dangers that could be dealt out by nature and the animals and how if he made wrong decisions it could possibly bear bad and hazardous results.
He understood the fact that even though he was a brilliant marksman meant little unless he took in the complete picture. He was taught and trained to be 'SITUATIONALLY AWARE!' He was taught that besides his skills as a marksman, management and planning was of ultimate importance!
So where do we start with obtaining 'good eye sight?'
Why not start with sharpening up our basic Visual Navigational Skills! Why not start by sharpening up our ability of taking in how what we see on the map and what we see on the ground ties up in our minds as being logical and reasonable in terms of our positioning in relationship to time, space, terrain, weather conditions and aircraft systems status and performance.
Edging up of these skills will serve to pre-warn and protect us from stupidly following other misinformation perceived contrary to the continuation of safe flight for the conditions and pilot qualifications and will assist us to make well processed, educated and command based pre flight and in- flight decisions.
What to have?
· A serviceable aircraft with all documentation, valid pilots licenses and equipment fully up to date.
Q What documents are required? What is Part 61? What is Part 91?
· A fine day.
Q What are the VFR requirements? What does CAVOK mean? What does BCMG mean on a TAF?
· Access to all Aeronautical Information pertaining to the area in which the flight is to take place, AIC's, AIP's, Notams, Airspace and Aircraft Pilot Operating Handbook.
· A 1:250,000 scale Topographical Map of the area in which the sortie is to be flown.
· Flight computer, Protractor, dividers, pencil, scale ruler. Etc.
· Flight Log Sheet.
· Mass and Balance Load Sheet.
· Consideration of ATC Flight Plan?
Planning the route - what considerations?
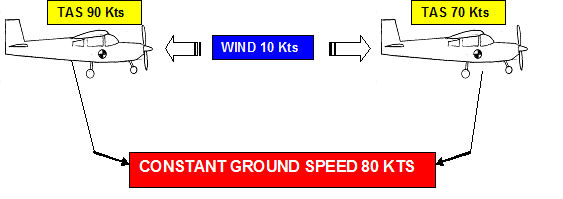
Note: For your first few exercises, plan on using a Constant Ground Speed. This means that the True Airspeed will have to be adjusted on each leg in order to compensate for tail and headwind components to maintain a Constant Ground Speed on the leg.
(Similar exercises can be flown by factoring in forecast Wind Velocities and flying variable Ground Speeds for each leg whilst maintaining a constant TAS).
Q From the TAS how would you determine the RAS (or near enough IAS) for your intended Pressure Altitude and temp?
· Selection of desired Turn points.
· Airspace, Aic's Aip's, Notams.
Q What is a TMA, CTR, ATZ , VFR communications failure procedure?
· Aircraft Type performance and POH.
Q what is the T/ O distance required for your aircraft at MTOW for an airfield 5,500' elevation QNH 1025, Temp 30ş C, level tar runway, 5 kt headwind component?
· Meteorological Conditions.
Q What is the Maximum Demonstrated cross wind component for your aircraft?
· Minimum Height.
Q what are the minimum heights required? How do Altimeter Setting Procedures apply to your planned flight? When last did you recap on Altimeter Setting Procedures?
· Terrain over which to be flown.
· Threats and Risk Assessment and Management.
Q what conditions could pose a threat to the safety of your planned exercise?
· Possible Errors and Violations.
Q what likely errors could be made? Am I at risk of falling prone to a violation?
· Airmanship and Engine Handling.
· Fuel Management and reserves.
Q what are the fuel planning requirements for VFR operations?
Marking up the Map.
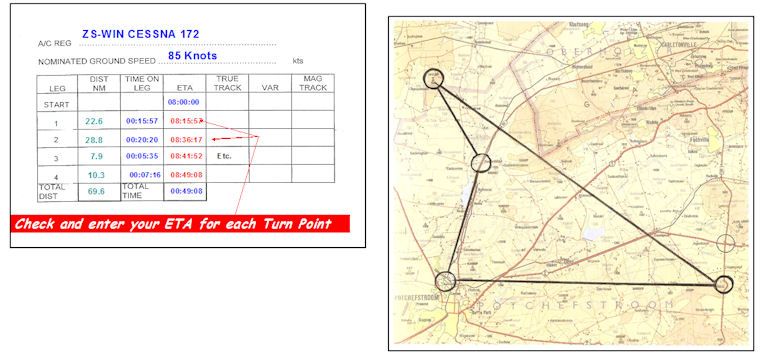
In the example below the base Airfield is Potchefstroom (FAPS) with a typical exercise as follows:
On the Map:
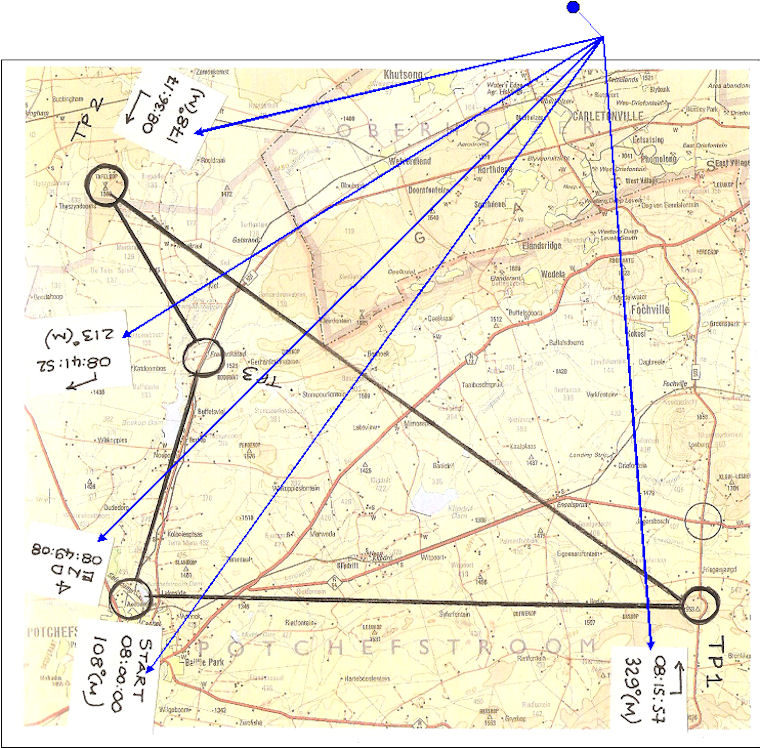
1) Draw a neat circle around the departure airfield or Start Point as well as around all of your preselected
Turn-points.
In this case your selected Turn Points are:
· Turn Point 1: Trigonometry Beacon 1553 elevation
· Turn Point 2: Trigonometry Beacon 'Taffelkop' 1569 elevation
· Turn Point 3: Railway Station ' Frederikstad'
· Finish: Overhead Windsock FAPS.
2) Connect these points in sequence by a heavy pencil line joining the centers of the turn-points and end point. (keep the inside of the circle clear so that information on the map is not obscured)
3) Using a pair of dividers or suitable scale, measure each leg distance. (This is best done from the Latitude scale along a Line of Longitude).
Q Why must distance be measured on the Latitude scale and not the Longitude Scale? 1 degree of latitude is equivalent to how many Nautical Miles?
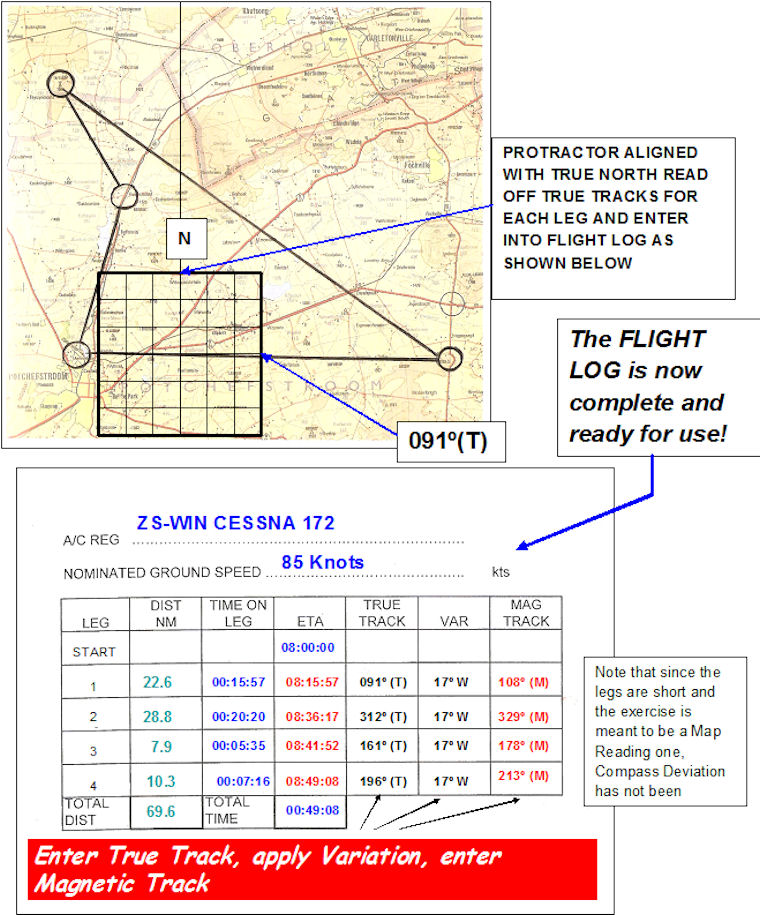
4) Enter the Distance for each Leg into the Flight Log as shown.
5) Using the accurately measured distances now calculate the time to the nearest second
for each leg. Using a predetermined departure time overhead your start point calculate an ETA for each Turn Point and enter these on the Flight Log.
6) Using a Protractor measure the True Track for each leg
Q Why must track be measured at the midpoint of a track? What is a Rhumb Line? What is a Great Circle Track?
ON SHORT LEGS LIKE THESE IT WILL MAKE NO DIFFERENCE WHETHER YOU MEASURE THE TRACK AT THE START OR THE MIDPOINT OF THE TRACK.
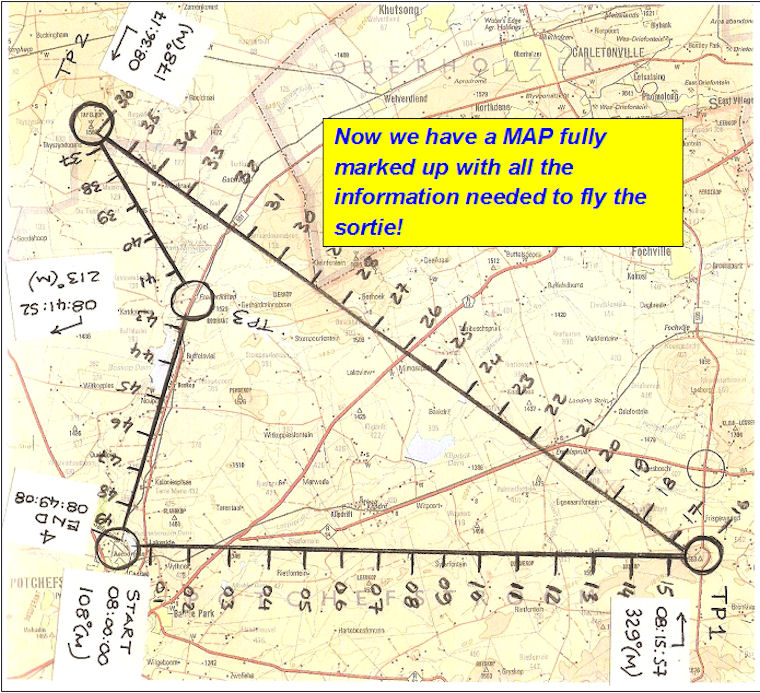
We are now ready to fly the sortie!
· After becoming safely airborne position yourself to be overhead the Start Point at a safe altitude (comply with all traffic and procedures as required) at the scheduled time of 08:00:00 (A digital read out clock works the best)
· Set Course i.e. 108ş Magnetic. Using the Map, Orientate and align yourself with ground features and the desired Track. Always hold and read the map with the track line drawn on the map orientated in the direction of the track on the ground.
· Since no wind velocity has been applied to your Flight Log calculations you will have to assess the drift that must be corrected for and also the Head/Tail wind component. A good pilot always has informed information before take off so you should already have an educated idea as to how the wind will affect the flight.
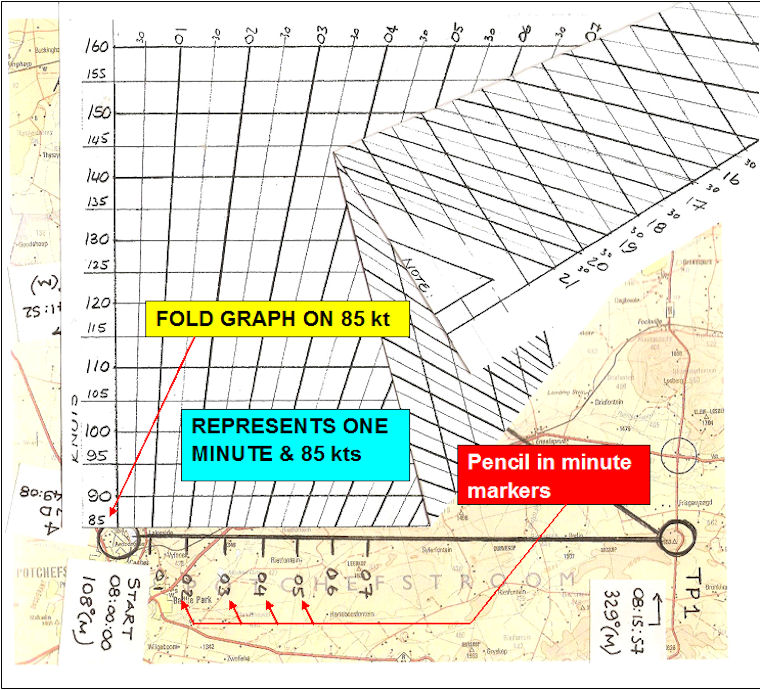
· Using the times shown by the minute markers on the map make small adjustments to the Power Setting in order to arrive at ground features at the scheduled times and so that the predetermined Constant Ground Speed can be maintained.
· At the same time ensure that you are maintaining the required Track over the ground by making the necessary Heading alterations to compensate for drift.
· If you get this right you will arrive at your first Turn Point pretty much on schedule. Don't forget FREDASS approaching each Check Point!
· Approaching each Turn Point anticipate Hdg and Orientation for next Leg.
· Do the same for all legs.
· Be sure to always maintain a safe altitude and safe airspeed. Be sure to keep an exceptionally good look out at all times.
This is an excellent way to hone your overall Navigational and Flying Skills whilst doing something constructive during the process of building hours for a higher rating. You will be surprised at how accurately a course can be flown after a little practice - within a few seconds and almost spot on track.
Obtaining and honing these skills might one day 'save the day' when other usually reliable sources of information cease to produce - 'Back to BASICS' - good pilot skills!
Effective scanning of 'overall situations' and then processing the incoming information and acting appropriately is an acquired art which can be developed through training and is a very good way to improve our 'EYE SIGHT!' (situational awareness)
The South African Power Flying Association SAPFA is very active in the organization of official events which are well worth looking into. Visit their website www.sapfa.org.za
Until next time fly safely, exercise only the best of Airmanship, Plan well and enjoy!!!
 |
 |
 Copyright © 2024 Pilot's Post PTY Ltd
The information, views and opinions by the authors contributing to Pilot’s Post are not necessarily those of the editor or other writers at Pilot’s Post.
Copyright © 2024 Pilot's Post PTY Ltd
The information, views and opinions by the authors contributing to Pilot’s Post are not necessarily those of the editor or other writers at Pilot’s Post.